I know there are tons of parking tutorials and demonstrations out there, but the method I use was kind of mashed together from bits I liked out of two or three tutorials I found, so I thought I'd go ahead and show my own personal adaptation of parking and hope that it encourages you to find your own way to use this method. :)
I've never made a tutorial before, and didn't really plan it at all. I just started taking some pictures as I was stitching, and thought I'd do a demo. Like other tutorials, I am showing a bit of the chart, but this pattern has 412,388 stitches. I doubt you'll be able to reproduce it by looking at a few hundred stitches.
First, I'd like to explain how I park. I like to stitch one column at a time, moving left to right across a row of pages. I stitch all the way down each column, then park my threads in the next column to the right, carrying my threads across rather than down. I do this because I know I'm going to take years to finish each project, and I don't want hundreds of threads hanging down and looking messy during all that time. I know proper storage would keep them from getting tangled and dirty etc. This is just my personal aesthetic preference.
I also like to stitch over more than one 10x10 block at a time. I do grid my fabric, usually with a fabric pencil, though this step isn't necessary. I just find it helpful. Each of my columns is 10 stitches across, but I often stitch down several rows, depending on how much of my current color I'm stitching. If there are only a few dozen stitches of a color, I might stitch down the entire column with that color and park it in the next column. For each block, I prefer to finish off the smaller bits of color, then finish with that block's "main" color. I think it makes the back look neater and helps to keep threads secure, but that's just my opinion. I hope I'm not muddling my explanation. Hopefully this will be more clear with the pictures below. :)
So here's where I started, halfway down a column (first pic).


I've got three parked threads in the next block down (pic #2). All the messy threads to the right are how I end each strand. I just skip a column, then bring the thread to the front. Once the intervening column is stitched, the threads are secure, and I snip them off close the fabric.
I'm starting with the middle of the parked threads (pic #3), whose symbol is "V". I like to use highlighters on a paper chart when I stitch, with three colors. Orange represents the color I'm currently stitching, so all the Vs are highlighted in orange for the next two blocks (pic #4). Pink is for parked threads. That way I can spot them at a glance on the chart without confusing them with other stitches. Once a thread is stitched, I go over it with blue. I like using a highlighter instead of a pen or marker as it's quicker, and if I make a mistake or miss a stitch accidentally, I can still see the symbols.
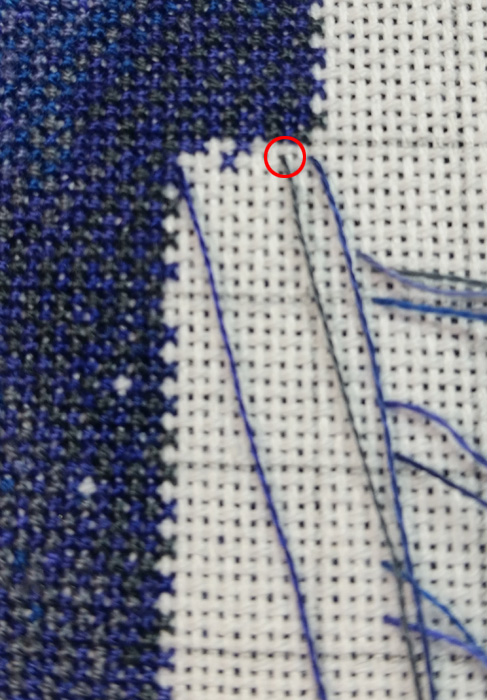

When you park a thread, make sure you are consistent with your parking spot, so to speak. There are only two spots to choose from regardless of stitching direction, or whether it's full or half crosses: there's the upper or the lower hole. When picking up a thread, I prefer to make the first leg of my stitch from left to right, bottom to top. Therefore, all of my threads are parked in that starting position: the lower left hole of the cross stitch square (pic #5).

If you stitch in this same direction, you could just as easily park in the upper right spot and make your first leg top to bottom. The choice is up to you, so long as you follow your natural stitching style. Just be comfortable and consistent! When I first began parking, I would use a sharpie to make a little black dot in the lower left corner of the parked stitch on the chart, just to remind me of the orientation I chose.
Now I've stitched all the Vs I had highlighted, and have parked that thread in the grid below (pic #6). On my chart, I've marked off what I've stitched, and now have a new pink highlighted V to mark where I've parked (pic #7).


The next thread I'll pick up is the box with an X through it. I call this symbol "the envelopes" cuz that's what they look like to me. :) But notice how the second grid is mostly the envelope symbol? That, to me, makes that symbol the second grid's "main" color, which I want to do last. So, I'm only going to stitch the envelopes as far as the first grid, then park it for the second. Even though I stitched the Vs down two blocks, there is no rule that says I have to stitch all threads evenly. I can stop and start them when and wherever I choose. :)

Here I've stitched the envelopes as far as the first grid, and now it's parked, shown with the arrow, and ready for the second grid (pic #8). Sorry I didn't take a new pic of the chart here. (Told ya I did this with no planning.) I only have one more parked thread, the 7s, but there is another color in this grid that doesn't have a parked thread. And because the 7s are my main color for the current grid, I want to get all the other colors done first. So I'm ignoring that parked thread for the moment and have started a new thread for the White Hearts. I use the pin stitch to start threads, but there are other methods, like waste knots, or weaving it into the back, etc.
There weren't many White Hearts in the subsequent grids, so I've stitched it all the way down the rest of the column. I think this makes the other grids easier, with less stopping and starting to rethread the needle, but again, this is just personal preference. The next parking spot for the White Hearts is at the top of the next column, but I don't want to carry my thread that far (though you could, I'm not judging). Instead, I will end it here by using the three column method.


Since the last stitch was in column A, I'm skipping column B and bringing my needle up in column C. That way, when column B is stitched, this thread will be nice and secure under those stitches, and all ended threads in column C will be snipped. For now, I'll just leave a little tail, about one inch long, so it doesn't disappear before it's secured.

Now I've got the thread for the White Hearts parked at the top of the next column, so I'll set that aside and continue stitching on my current column. The only symbol left in the top grid is the 7s, so I'll stitch that down the next two grids, then I'll pick up the envelopes to finish off.

So there you have it! Two grids finished, with three parked threads ready for the next grid, with the process being exactly the same. Choose a thread to stitch for a short while, park, then move to the next thread. I like to think of parking as cross country stitching within a very limited area. Just remember, you can adapt this method to suit you any way you choose.
I hope this was helpful to you in some way. I'd like to offer a list of other parking demos I found helpful, though this is by no means a comprehensive list:
Ronjja's Parking Guide is what made things really click for me, and my style is pretty much identical to hers, though she uses waste knots. She also has a Youtube Parking Guide that's very good.
Becca's Parking Guide is one of the first I found (and can't believe it's still there). It's a bit blurry, but has lots of good info, and shows parking with tent stitches.
The Crafty Writer has an excellent demo, with a bit more confetti than I've got here.
Carolyn Mazzeo has a wonderful video on parking in the more traditional sense. She does one grid at a time, and carries her thread down to the bottom of her work.
Thanks for reading! Questions and suggestions are welcome. Happy stitching!
Looking for Parking Book Online Now - https://primeparktoronto.ca/toronto-pearson-valet-parking Toronto Pearson Valet Parking - best in Toronto.
ReplyDeleteGreat work—I’ll definitely be putting this to use.
ReplyDelete